Recently in Electric Vehicles Category

Tim writes asking how he could charge his 8S2P Prius battery pack used in an experimental EV. My Piaggio is 6S2P and I encountered numerous problems. Here was my response to him:
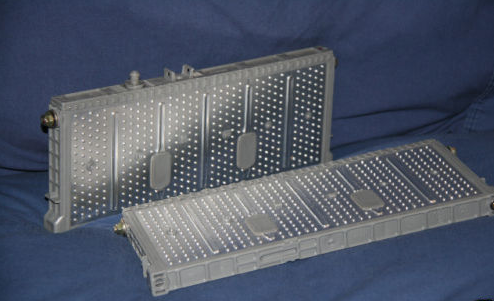
Using Prius packs are tricky and 8S2P is going to be even more difficult. Here are the problems:

  1. Charging voltage is very high

  2. Even "smart" chargers cannot detect Prius battery delta-V or delta-T to stop charging
  3. No parallel charging
  4. Packs expand on charging

* High voltages

Prius NiMH batteries are internally 6 cells, so a 6S pack is really a 36 cell pack, with nominal voltages of 43.2 volts (but usually hot off the charger at around 50 volts). An 8S pack would be 48 cells, so nominally 57.6 volts with a hot off the charge voltage above 60 volts.

Then the problem is that almost all commercial NiMH chargers go up to 50V (and even those are rare). I had trouble finding chargers for my 36-cell pack. The two I bought were: Astroflight 112D (NiMH version) and the "CH-UN4820 Multi-Current Smart Charger (2.0A) with 3 pins Plug for 36V or 48V NiMH / NiCd Pack."

You will most likely have to split your pack in half so you only charge 4S (24 cells) at a time.

* No parallel charging

First, you know you should never charge in parallel, so you need to add some connectors so you can charge as two 8S1P and 8S1P packs -- or four 4S1P packs. I recommend Anderson 75A power pole connectors.

* Smart chargers can't detect Prius delta-T/V

NiMH batteries are tricky to charge as there isn't a fixed final voltage as with LiIon/LiPo/Lead-acid. Instead, smart chargers usually look for a very small drop in voltage (delta-V) which signals the cell is full; or an increase in cell temperature (delta-T).

Unfortunately, Prius packs don't exhibit a measurable drop in voltage and don't increase in temperature when they are full. This is partly because of their pack design (prismatic rather than cylindrical). Instead, when a Prius pack is full, it bulges due to the increased internal pressure. Not good.

* Packs expand when charged

The prismatic (rectangular) Prius packs will swell and expand when they are overcharged. In order to prevent this, you have to design a strong battery holder that will keep good lateral pressure on them. My own holder (below) uses threaded rod and steel plates to hold the packs together. Even with 2mm steel, the packs have put enough pressure on the side plates to bend them and I'll have to make up new side plates sometime soon.


* How to charge

So how do you charge a Prius pack? I haven't found a smart charger smart enough to charge them using the standard delta-T and delta-V. So instead, I do what the battery management system in the Prius does -- I coulomb count. With my CycleAnalyst, I know how many watt-hours I've used in a ride. For example, for my commute I used 234.23 Wh which is around 5.90 Ah.

Knowing that my multi-current "smart" (stupid) charger has a nominal charge rate of 2.0 amps (and using a wattmeter), I set the charger using a timer to charge for 3 hours. This gives me 3 hours x 2 amps = 6 amp hours.

I have to repeat this twice, one for each side of my parallel chain.


I'm in the process of designing my own charge circuitry that will allow me to automate the coulomb counting. It will measure the output of the battery, then put the same back in (+10% for charging inefficiency). For a backup foolproof end-of-charge detection, I plan on using load cells to detect when the cells are expanding from internal pressure.

Of course, I'm busy with my day-job so this advanced Prius pack charger is still many many months (if not years) away given that a simple charger with a timer does much the same.

Boxer EV v4 Photos

| | Comments (3)

I thought I would post some images of the latest iteration of my Piaggio Boxer EV project. I hadn't actually shown the Prius batteries mounted, even though I had done that almost a year and a half ago.


This is the front, showing new 9 watt LED front bulb. Blindingly bright:

PiaggioBoxerEV4 001


This is the Prius pack mounted in the 6s2p configuration, given me 43.2 volts @ 13 Ah nominal. I made the battery carrier myself. The motor speed controller is below the pack, but it's hard to see from this angle:

PiaggioBoxerEV4 002

This shows the new style HobbyKing motor mounted. The new motor was longer than the old one (even though the specs on HobbyKing's site weren't updated) which meant it could no longer fit in the old motor mount. I had to weld together my own motor mount. Right now, I'm holding the motor only on one side, leaving the other open for the cooling fan (made from a PC computer fan) - note that the motor spins counter-clockwise from this perspective, so the fan draws air into the motor. I think I'll eventually end up making a retention bracket for the right side as well, to prevent too much stress on the bearings on motor:

PiaggioBoxerEV4 003

This left hand side shows how the motor was moved forward in order to fit:

PiaggioBoxerEV4 004

A little view of the wonderful CycleAnalyst:

PiaggioBoxerEV4 005


This is the new reverse-current board that I made using MOSFETs. It's not perfect, but it's more efficient than the blocking diodes that I used -- which were expelling 1.7 volts @ 100 amps == 170 watts when the motor was at full speed!


PiaggioBoxerEV4 006

Ending with another side view.

PiaggioBoxerEV4

I burnt out the original brushless motor and installed a new one, here's the new revised bill of materials (BOM) (dated 2011.5):

PiaggioBoxerEV4
Base Unit Piaggio Boxer (1971)
- 50 cc 2-stroke internal combustion engine (removed)
Electric Motor Turnigy 80-100-A 180Kv Brushless Outrunner from Hobby King
  • - Tachs: 7700 rpm @ 43.2v nominal (6500 rpm @ 36v)
  • - Max amps drawn: 140A @ 43V
  • - Max watts drawn: ~ 6 kilowatts
  • - Geared with 250A front pulley and notched V-belt
  • - Speed: 50 kph top speed (at current gearing)
Electronic Speed Controller Castle Creations Phoenix HV-110 (link)
- 110 amps @ 50 volts limit
- Force air cooled
Throttle Magura 0-5K Potentiometer motorcycle twist grip throttle
Servo Tester (Pot to ESC) Boman Industries Polar-Matic PC-50 (ebay)
-modified for use with Magura pot and HV-110
Power Monitor Cycle Analyst (link)
Batteries Prius Gen 2 NiMH
- 6S2P packs (12 in total)
- 43.2 volts nominal @ 6.5 Ah each
- 43.2 volts nominal @ 13 Ah combined
- 330 watt-hours (conservative)
- Range: unknown but estimated 7 km based on 45 Wh/km and 330 watt-h calculation
Power Connectors - Anderson PowerPole 75A on main connections - link
- Anderson PowerPole 30A on sub connections - link
Wiring - 8 gauge stranded copper on main power lines and motor leads
- 12 gauge stranded copper on sub power lines
Lighting - Front lighting using 10-Watt LED (driven at 12v @ 750ma; specced at 500~600 lumens @ 6500K )
- Rear lighting using high-power red LEDs
Low Voltage (48VDC to 12/5 VDC) DC:DC Converters
  1. Twin 12VDC @ 3A DC:DC converters using the National Semiconductor LM2576HVT-12-ND buck-converter
    1. Unit 1: Front and rear lighting, motor cooling fan
    2. Unit 2: ESC controller cooling
  2. 12 volt to 5VDC converter using MC34063 Based Switching Regulator for front lighting (currently bypassed)
  3. Quark Pro BEC 3A 5V UBEC for servo tester / RC components
Things I burned out/destroyed
  • E-Sky EK2-0907 Servo Tester
  • Doc Wattson power monitor
  • ELF 100 ESC speed controller
  • Castle Creations Phoenix HV-110
  • HXT 80-100-B 130Kv Brushless Outrunner motor
  • Right index finger on burnt out ESC
  • Power diodes for battery tap
  • Various burns and scrapes
  • My pride :-)

Please leave comments and questions on this post!

Me want a Honda Gyro Canopy. Perfect for commuting to work in harsh New England winters, along with your little puppy:


honda-gyro2.jpg

Unfortunately, very difficult to find in the USA and I'm not sure I want to go to the trouble of importing one from Japan just to convert it to EV.

Or maybe I can skip the whole EV conversion if I can find an elusive electric Daihatsu Hallo, whose "two 12V batteries, whose 75Ah capacity gave it a 30km range at a speed of 30km/h."

ElectricDaihatsuHallo.jpg

In my search for info on calculating EV efficiency, came across this interesting article with java calculators: http://www.ecoworld.com/transportation/the-battery-powered-car.html

The articles mention that standard EV car efficiency is around 4.4 kilometers (2.7 miles) per kilowatt-hour.

My little scooter gets around 40 watt-hours per kilometer on SLA (I need to get new figures for the 43.2 volt NiMH packs). Flipping that around, that's 25 km per kWh. That's around 16 miles per kWh.


PriusGenIINiMH.pngI just won a bid for twelve Prius packs! They should hopefully be arriving later this week or early next.

Update: Batteries arrived and ready to be installed!

Each pack is a 7.2 volts 6.5 Ah prismatic NiMH battery with six cells. I'll be configuring them as 6S2P for 43.2 volts 13 Ah. I'm hoping that I can get at least 60% of the SOC from them (80% to 20% as on the Prius). That would be 43 volts, 7.8 Ah or 335 watt-hours.

This is perfect as I'm currently consuming 200 watts-hours each way with the heavy SLAs. The lighter NiMH packs should get my power consumption down even lower.

TypeDescriptionWhWeight
SLATempest TR35-12 (rated 35Ah)
-- 35 Ah @ 36 volts
-- I don't get 35Ah, closer to 10 Ah due to Peukerts

Specific Energy 35 Wh/kg nominal
Specific Energy 10 Wh/kg derated
360 Wh 1 @ 11.8 kg
3 @ 35.4 kg (78 lb)
NiMHPrius Gen II Battery (rated 6.5Ah) @ 1040 grams
-- 13 Ah @ 43.2 volts
-- derated 60% for a conservative Ah of 7.8 Ah

Module Weight 1040 g
Specific Power 1300 W/kg

Specific Energy 46 Wh/kg nominal
Specific Energy 27 Wh/kg derated
335 Wh 1 @ 1.04 kg
12 @ 12.48 kg (27.5 lb)

It looks like I'll be saving a good 20 kilograms or 50 pounds with only a slight loss in Watt-hours! I will have to bodge up a new battery carrier as the cells need to be kept under compression when being charged.

Revised bill of materials (BOM) (dated 2009.09):

[moved to after the jump]

When I was first starting out with the Piaggio conversion, I was monitoring my power consumption using a Doc Wattson / Watt's Up. Good for checking on amp-hours used, voltage, etc.

watts-up.gif

A few weeks into the conversion, I dropped my bike chain on the Doc Wattson and broke the LCD glass. Very annoying -- they should provide a lexan cover on things like this that will get banged around.

I asked the manufacturer if they did repairs and they didn't. I asked them for the spec on the LCD and they said it wasn't divulge-able. They did give me a discount on my second one and I threw the old one in my "crash" bin.

Well, fast forward a few months more and I've been working with STAMPS and PICs and know a bit more about LCD screens -- especially how most 16x2 displays are driven using the same HD44780 IC chip.

Time to open the Doc Wattson up and see what's in it.

More after the jump

This is the post-flameout, rebuilt Piaggio Boxer EV. I changed the battery carrier from a top-mount system to saddle bags. This lowers the center of gravity and makes it easier to handle. I'm going to replace the seat with something more classic looking.

P1050018.jpg


I welded the saddlebag carriers myself from steel tubing with my MIG welder.

P1050020.jpg

The Electronic Speed Controller (ESC) is sitting on top. It's the replacement HV-110 that I received from Castle Creations with additional capacitors soldered in parallel on the input lines.

P1050030.jpg


It's sitting in a Lexan enclosure that I bodged together. Unlike the old metal enclosure with a single temperature controlled fan, the new enclosure uses two fixed speed fans that pull the air across the ESC and the voltage converters (sitting below). They also are assisted by draft air when the vehicle is at speed.

P1050023.jpg

This photo was taken a few minutes after a short run, the temp of the caps is 34 centigrade which is nominal. Anything less than 60 centigrade I think will be ok. The caps are rated at 85C.

Although the angle of the photo above makes it look like the ESC could short out on the voltage converters, it's actually held a centimeter or so above and everything is well insulated.

My little Piaggio-EV is back up and running. I made the following mods:

  • My replacement HV-110 is now installed in an external plexiglass box with (much) better airflow and forced as well as passive air cooling. The forced cooling is on full all the time rather than the temperature variable fan that I used to have.
  • Extra caps (470 uF x 6) soldered in parallel with input leads
  • (Slightly) beefier wiring used -- 8 gauge rather than 12 ga
  • 75 amp Andersen PowerPoles used instead of 30A
  • Wiring shortened a bit
  • Thermometer probe directly on caps to monitor heat

So far, it seemed ok. After my ride to work this morning, the caps heated up a bit -- from 17°C ambient at the beginning to 37°C ambient at the end of the 5 kilometer ride. I'm working on getting even more cooling in there.

6 amps used. 30 watts/kilometer average energy expenditure.

About this Archive

This page is a archive of recent entries in the Electric Vehicles category.

Batteries / Power Systems is the previous category.

Electronics / Controllers is the next category.

Find recent content on the main index or look in the archives to find all content.