Recently in Nickel (NiMH, NiCad) Category

Tim writes asking how he could charge his 8S2P Prius battery pack used in an experimental EV. My Piaggio is 6S2P and I encountered numerous problems. Here was my response to him:
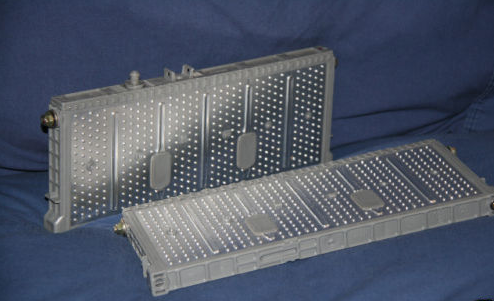
Using Prius packs are tricky and 8S2P is going to be even more difficult. Here are the problems:

  1. Charging voltage is very high

  2. Even "smart" chargers cannot detect Prius battery delta-V or delta-T to stop charging
  3. No parallel charging
  4. Packs expand on charging

* High voltages

Prius NiMH batteries are internally 6 cells, so a 6S pack is really a 36 cell pack, with nominal voltages of 43.2 volts (but usually hot off the charger at around 50 volts). An 8S pack would be 48 cells, so nominally 57.6 volts with a hot off the charge voltage above 60 volts.

Then the problem is that almost all commercial NiMH chargers go up to 50V (and even those are rare). I had trouble finding chargers for my 36-cell pack. The two I bought were: Astroflight 112D (NiMH version) and the "CH-UN4820 Multi-Current Smart Charger (2.0A) with 3 pins Plug for 36V or 48V NiMH / NiCd Pack."

You will most likely have to split your pack in half so you only charge 4S (24 cells) at a time.

* No parallel charging

First, you know you should never charge in parallel, so you need to add some connectors so you can charge as two 8S1P and 8S1P packs -- or four 4S1P packs. I recommend Anderson 75A power pole connectors.

* Smart chargers can't detect Prius delta-T/V

NiMH batteries are tricky to charge as there isn't a fixed final voltage as with LiIon/LiPo/Lead-acid. Instead, smart chargers usually look for a very small drop in voltage (delta-V) which signals the cell is full; or an increase in cell temperature (delta-T).

Unfortunately, Prius packs don't exhibit a measurable drop in voltage and don't increase in temperature when they are full. This is partly because of their pack design (prismatic rather than cylindrical). Instead, when a Prius pack is full, it bulges due to the increased internal pressure. Not good.

* Packs expand when charged

The prismatic (rectangular) Prius packs will swell and expand when they are overcharged. In order to prevent this, you have to design a strong battery holder that will keep good lateral pressure on them. My own holder (below) uses threaded rod and steel plates to hold the packs together. Even with 2mm steel, the packs have put enough pressure on the side plates to bend them and I'll have to make up new side plates sometime soon.


* How to charge

So how do you charge a Prius pack? I haven't found a smart charger smart enough to charge them using the standard delta-T and delta-V. So instead, I do what the battery management system in the Prius does -- I coulomb count. With my CycleAnalyst, I know how many watt-hours I've used in a ride. For example, for my commute I used 234.23 Wh which is around 5.90 Ah.

Knowing that my multi-current "smart" (stupid) charger has a nominal charge rate of 2.0 amps (and using a wattmeter), I set the charger using a timer to charge for 3 hours. This gives me 3 hours x 2 amps = 6 amp hours.

I have to repeat this twice, one for each side of my parallel chain.


I'm in the process of designing my own charge circuitry that will allow me to automate the coulomb counting. It will measure the output of the battery, then put the same back in (+10% for charging inefficiency). For a backup foolproof end-of-charge detection, I plan on using load cells to detect when the cells are expanding from internal pressure.

Of course, I'm busy with my day-job so this advanced Prius pack charger is still many many months (if not years) away given that a simple charger with a timer does much the same.

Boxer EV v4 Photos

| | Comments (3)

I thought I would post some images of the latest iteration of my Piaggio Boxer EV project. I hadn't actually shown the Prius batteries mounted, even though I had done that almost a year and a half ago.


This is the front, showing new 9 watt LED front bulb. Blindingly bright:

PiaggioBoxerEV4 001


This is the Prius pack mounted in the 6s2p configuration, given me 43.2 volts @ 13 Ah nominal. I made the battery carrier myself. The motor speed controller is below the pack, but it's hard to see from this angle:

PiaggioBoxerEV4 002

This shows the new style HobbyKing motor mounted. The new motor was longer than the old one (even though the specs on HobbyKing's site weren't updated) which meant it could no longer fit in the old motor mount. I had to weld together my own motor mount. Right now, I'm holding the motor only on one side, leaving the other open for the cooling fan (made from a PC computer fan) - note that the motor spins counter-clockwise from this perspective, so the fan draws air into the motor. I think I'll eventually end up making a retention bracket for the right side as well, to prevent too much stress on the bearings on motor:

PiaggioBoxerEV4 003

This left hand side shows how the motor was moved forward in order to fit:

PiaggioBoxerEV4 004

A little view of the wonderful CycleAnalyst:

PiaggioBoxerEV4 005


This is the new reverse-current board that I made using MOSFETs. It's not perfect, but it's more efficient than the blocking diodes that I used -- which were expelling 1.7 volts @ 100 amps == 170 watts when the motor was at full speed!


PiaggioBoxerEV4 006

Ending with another side view.

PiaggioBoxerEV4

I burnt out the original brushless motor and installed a new one, here's the new revised bill of materials (BOM) (dated 2011.5):

PiaggioBoxerEV4
Base Unit Piaggio Boxer (1971)
- 50 cc 2-stroke internal combustion engine (removed)
Electric Motor Turnigy 80-100-A 180Kv Brushless Outrunner from Hobby King
  • - Tachs: 7700 rpm @ 43.2v nominal (6500 rpm @ 36v)
  • - Max amps drawn: 140A @ 43V
  • - Max watts drawn: ~ 6 kilowatts
  • - Geared with 250A front pulley and notched V-belt
  • - Speed: 50 kph top speed (at current gearing)
Electronic Speed Controller Castle Creations Phoenix HV-110 (link)
- 110 amps @ 50 volts limit
- Force air cooled
Throttle Magura 0-5K Potentiometer motorcycle twist grip throttle
Servo Tester (Pot to ESC) Boman Industries Polar-Matic PC-50 (ebay)
-modified for use with Magura pot and HV-110
Power Monitor Cycle Analyst (link)
Batteries Prius Gen 2 NiMH
- 6S2P packs (12 in total)
- 43.2 volts nominal @ 6.5 Ah each
- 43.2 volts nominal @ 13 Ah combined
- 330 watt-hours (conservative)
- Range: unknown but estimated 7 km based on 45 Wh/km and 330 watt-h calculation
Power Connectors - Anderson PowerPole 75A on main connections - link
- Anderson PowerPole 30A on sub connections - link
Wiring - 8 gauge stranded copper on main power lines and motor leads
- 12 gauge stranded copper on sub power lines
Lighting - Front lighting using 10-Watt LED (driven at 12v @ 750ma; specced at 500~600 lumens @ 6500K )
- Rear lighting using high-power red LEDs
Low Voltage (48VDC to 12/5 VDC) DC:DC Converters
  1. Twin 12VDC @ 3A DC:DC converters using the National Semiconductor LM2576HVT-12-ND buck-converter
    1. Unit 1: Front and rear lighting, motor cooling fan
    2. Unit 2: ESC controller cooling
  2. 12 volt to 5VDC converter using MC34063 Based Switching Regulator for front lighting (currently bypassed)
  3. Quark Pro BEC 3A 5V UBEC for servo tester / RC components
Things I burned out/destroyed
  • E-Sky EK2-0907 Servo Tester
  • Doc Wattson power monitor
  • ELF 100 ESC speed controller
  • Castle Creations Phoenix HV-110
  • HXT 80-100-B 130Kv Brushless Outrunner motor
  • Right index finger on burnt out ESC
  • Power diodes for battery tap
  • Various burns and scrapes
  • My pride :-)

Please leave comments and questions on this post!

Questions from Glenn about my Piaggio Boxer-EV:

1.After your initial problems with controller choice, have the motor and controller worked out OK for you? I'd be worried about motor cooling of something designed for air-over, prop slipstream.


Well, I've burnt out two controllers. I'm now force-cooling them with a high-speed fan designed for a blade server, so I'm hoping the present controller will last.  Right now, though, my bike is in the garage for an undiagnosed power problem. I'm thinking one of the motor power leads has broken, although I haven't had time for a full diagnosis.

The motor itself doesn't get that hot (although if I have melted a power lead, I'll have to go back on that statement).  I've measured it with an IR thermometer after running it and it doesn't get too much beyond 75°C.   I currently have it force-cooled with a fan. I'd ideally like to have it cooled by the air from the slip stream, but  there's too much risk of gunk / water getting kicked up by the wheel and pushed into the motor if I use a ram-jet type cooling vent.

2.Are you really using all 7kW(9+HP!) of the motors capacity? It seems like a lot for a bike your size.

No, my peak seems to be 90-100 amps at 36-48 volts or around 5 electric HP.  Which isn't a whole lot, many contemporary 50cc scooters will put out that much.

3.Do you know of any motors sized between your reasonably priced 7kW and the disgusting $2K 12kW units? Thanks, Glenn

The Etek motor and its clones seems to be the power unit of choice for many scooter /motorbike conversions.   Brand new, it's around $1000 - $2000 but you can find the clones on ebay for around $400-600. It comes in both brushless and brushed versions.

Karen

The weather was finally nice enough to commute to work this week on my Piaggio Boxer EV with Prius NiMH batteries.

Here's the data from my CycleAnalyst:

Run #1
1.18
(To)
Run #2
1.18
(From)
Run #3
1.19
(To)
Run #5
1.20
(To)
Distance5.2 km4.85 km4.21 km4.19 km
Efficiency45.1 Wh/km39.2 Wh/km42.2 Wh/km47.6 Wh/km
Energy used234.23 Wh189.87 Wh176.92 Wh199.03 Wh
Charge Used5.90 Ah4.28 Ah4.01 Ah5.01 Ah
Max Amps106 A101 A91 A101 A
Average Speed20.6 km/h23.3 km/h24.8 km/h24.1 km/h
Max Speed36.6 km/h40.3 km/h39.0 km/h36.6 km/h
Starting voltage---49.950.247.2
Ending voltage43.8v45.9v---44.2v
Run time15 min12:3010:1010:24

My commute is slightly uphill on the way to work and downhill on the way back, which accounts for the difference in energy efficiency going to and from work.

The bike feels much lighter than with the SLAs and faster too (even with the gear reduction) so I have to say it's an unqualified success. I just hope I can get good life out of these batteries.

After Run #4, I was in a rush and so I put the charger on and went to a talk and then came back. About 3 hours had passed and the charger had over charged the batteries. It actually wedged the battery holder apart. So I'm worried now that my batteries will be weakened -- even though most of the bulging has subsided.

I reinforced the battery holder this morning and we'll see how it holds up.

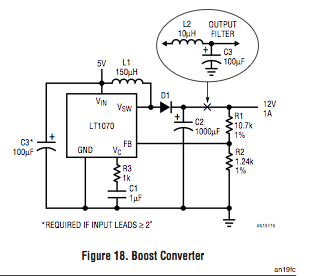
LT1070-Boost.png

On this cold New Year's Day, I've been thinking about the problem that NiMH batteries like to self-discharge. I'd love to trickle charge them with a low current but my current NiMH charger seems like 1) overkill; 2) liable to slip into the wrong charge mode and boil them dry; 3) too big of a hammer for this little nail.

So I thought of the 1.5 watt 12 volt solar chargers I had bought for my car back pre-Prius. These would be perfect except for the voltage. I think they are actually around 15 or 16 volts nominal, but my packs are 43.2 volts. So I need to boost the voltage....


Scrounging around the web, the best solution appears to be the LT1070 chip from Linear Technologies (www.linear.com). It requires minimal external components and comes with a through-hole TO-220 package for us non-SMD people.

So... how to design the right circuit..

This is my back of the napkin calculations using the design notes and should be taken with a huge grain of salt. Do not trust my calculations!

Vin = 14 volts
Vout = 48 volts LT1070-R1.png

R1 = R2 * ( 48v / 1.244 - 1) = 46.606 k ohms
R2 = 1.24 k ohms

Duty Cycle = (48v - 14v) / 14v = 70.8%

LT1070-L1.png

L = (14V * ( 48V - 14V)) / (0.5 A * 40 kHz * 48 v)

L = 476 / 960,000

L = 495.8 uH

C1 = arbitrarily 100 uF with a low ESR
C2 = (48v * 1A) / (40kHz * (14V + 48V) * (0.33 Vpp))
C2 = 48 w / 818,400
C2 = 58 uF


Here's a great link to why you shouldn't charge your NiMH packs in parallel: http://tlb.org/nimhboom.html

More info will be posted here as to how I'm charging my packs....

I have the Prius NiMH batteries installed and test drove it but the snowstorm of 2009 has put the dampers on harder testing. In any case, here's the new revised bill of materials (BOM) (dated 2009.12):

Base Unit Piaggio Boxer (1971)
- 50 cc 2-stroke internal combustion engine (removed)
Electric Motor HXT 80-100-B 130Kv Brushless Outrunner from HobbyKing
- link to new version of motor
- Tachs: 5600 rpm @ 43.2v nominal (4500 rpm @ 36v; 6000 rpm @ 48v)
- Max amps drawn: 100A @ 43V
- Max watts drawn: ~ 4300 watts
- Speed: 45 kph top speed (at current gearing)
Electronic Speed Controller Castle Creations Phoenix HV-110 (link)
- 110 amps @ 50 volts limit
Throttle Magura 0-5K Potentiometer motorcycle twist grip throttle
Servo Tester (Pot to ESC) Boman Industries Polar-Matic PC-50 (ebay)
Power Monitor Cycle Analyst (link)
Batteries Currently SLA: Prius Gen 2 NiMH
- 6S2P packs (12 in total)
- 43.2 volts nominal @ 13 Ah
- 330 watt-hours (conservative)
- Range: unknown
Power Connectors - Anderson PowerPole 75A on main connections - link
- Anderson PowerPole 30A on sub connections - link
Wiring - 8 gauge stranded copper on main power lines and motor leads
- 12 gauge stranded copper on sub power lines
Lighting - Front lighting using high-power Luxeon LED
- Rear lighting using high-power red LEDs
Low Voltage (12/5VDC) Converters
  1. 12VDC converter using National Semiconductor LM2576HVT-12-ND buck-converter for motor cooling fan, front lighting (via 5vdc) and rear lighting
  2. 12 volt to 5VDC converter using MC34063 Based Switching Regulator for front lighting
  3. Another 12VDC converter using National Semiconductor LM2576HVT-12-ND buck-converter for ESC controller cooling
  4. Quark Pro BEC 3A UBEC for servo tester / RC components
Things I burned out/destroyed
  • E-Sky EK2-0907 Servo Tester
  • Doc Wattson power monitor
  • ELF 100 ESC speed controller
  • Castle Creations Phoenix HV-110
  • Right index finger on burnt out ESC
  • Various burns and scrapes

PriusGenIINiMH.pngI just won a bid for twelve Prius packs! They should hopefully be arriving later this week or early next.

Update: Batteries arrived and ready to be installed!

Each pack is a 7.2 volts 6.5 Ah prismatic NiMH battery with six cells. I'll be configuring them as 6S2P for 43.2 volts 13 Ah. I'm hoping that I can get at least 60% of the SOC from them (80% to 20% as on the Prius). That would be 43 volts, 7.8 Ah or 335 watt-hours.

This is perfect as I'm currently consuming 200 watts-hours each way with the heavy SLAs. The lighter NiMH packs should get my power consumption down even lower.

TypeDescriptionWhWeight
SLATempest TR35-12 (rated 35Ah)
-- 35 Ah @ 36 volts
-- I don't get 35Ah, closer to 10 Ah due to Peukerts

Specific Energy 35 Wh/kg nominal
Specific Energy 10 Wh/kg derated
360 Wh 1 @ 11.8 kg
3 @ 35.4 kg (78 lb)
NiMHPrius Gen II Battery (rated 6.5Ah) @ 1040 grams
-- 13 Ah @ 43.2 volts
-- derated 60% for a conservative Ah of 7.8 Ah

Module Weight 1040 g
Specific Power 1300 W/kg

Specific Energy 46 Wh/kg nominal
Specific Energy 27 Wh/kg derated
335 Wh 1 @ 1.04 kg
12 @ 12.48 kg (27.5 lb)

It looks like I'll be saving a good 20 kilograms or 50 pounds with only a slight loss in Watt-hours! I will have to bodge up a new battery carrier as the cells need to be kept under compression when being charged.

iMax B6AC charger

| | Comments (0)
I just bought a used iMax B6AC charger (LiPo/Li-Ion/NiMH) to complement my previous Turnigy Accucel-8 charger. I had trouble finding the user manual but finally located it. I'm posting a copy here just in case anyone wants it: And here's a little comparison table that I drew up comparing the iMax with the Turnigy units:
iMax B6ACAccucel-6 Accucel-8
Max Power50 watts50 W150 W
Max Current5.0A5.0A7.0A
Max LiPo Cells668
Max NiCD/NiMH Cells151527
Max Pb20v20v36v
Power Input100-240 VAC
11-18 VDC
10-18 VDC10-18 VDC

About this Archive

This page is a archive of recent entries in the Nickel (NiMH, NiCad) category.

Lithium (LiPo, Li-Ion, LiFePo, etc.) is the previous category.

Solar is the next category.

Find recent content on the main index or look in the archives to find all content.